> ## Documentation Index
> Fetch the complete documentation index at: https://ayrshare.mintlify.site/llms.txt
> Use this file to discover all available pages before exploring further.
# Notion
> अपने उपयोगकर्ताओं के सोशल मीडिया खातों को प्रबंधित करने के लिए Ayrshare API को अपने Notion ऐप में एकीकृत करें
## अवलोकन
[Notion](https://notion.so) एक वर्कस्पेस ऐप है जो नोट-टेकिंग, प्रोजेक्ट मैनेजमेंट, विकीज़, और एक अनुकूलन योग्य डेटाबेस को एक GUI इंटरफ़ेस में जोड़ता है।
Notion से आप Ayrshare के सोशल मीडिया API के साथ अपने उपयोगकर्ताओं के सोशल मीडिया खातों को प्रबंधित करने के लिए एक इंटरफ़ेस बना सकते हैं, जो आपको पोस्ट करने, एनालिटिक्स प्राप्त करने, और टिप्पणियों का प्रबंधन करने की अनुमति देता है।
## ट्यूटोरियल
एक वीडियो ट्यूटोरियल जो दिखाता है कि आप सीधे Notion से अपने सोशल मीडिया नेटवर्क्स पर कैसे पोस्ट कर सकते हैं।
साथ ही हमारी [Notion API वॉक-थ्रू गाइड](https://www.ayrshare.com/blog/schedule-social-media-posts-from-notion/) भी देखें।
Notion सोशल पोस्टिंग एकीकरण का Github कोड:
सीधे Notion से अपने सोशल मीडिया नेटवर्क्स पर पोस्ट करें
### एक Notion डेटाबेस बनाएँ
Notion में, निम्नलिखित कॉलम नामों और कॉलम प्रकारों के साथ टेबल व्यू में एक डेटाबेस बनाएँ:
`Post` को *Title column* प्रकार के रूप में (यहाँ आपके पास कॉलम प्रकार का विकल्प नहीं है)
`Platforms` को *Multi Select column* प्रकार के रूप में जिसमें मान हों: `facebook`, `instagram`, `twitter`,
`linkedin`, `tiktok`, और/या `telegram`।
`Images` को *Files & Media column* प्रकार के रूप में।
`Profile Keys` को *Text column* प्रकार के रूप में।
`Status` को *Text column* प्रकार के रूप में।
`Schedule Date` को *Date column* प्रकार के रूप में जिसका Date Format Month/Day/Year, Time Format 24 Hours हो, और
समय शामिल हो
इन फ़ील्ड्स का उपयोग इस पेज पर बाद में निर्दिष्ट स्क्रिप्ट में किया जाएगा। कृपया ध्यान दें, कुछ सोशल नेटवर्क "प्लेटफ़ॉर्म्स" के लिए इमेज या वीडियो की आवश्यकता होती है। उदाहरण के लिए, Instagram के लिए एक इमेज या वीडियो और TikTok के लिए एक वीडियो की आवश्यकता होती है। कृपया विभिन्न नेटवर्क्स के लिए [एंडपॉइंट्स](/apis/post/social-networks/facebook) देखें।
[एक लाइव Notion उदाहरण देखें](https://ayrshare-example.notion.site/607c15ce7872456a879adbb0a5f17fdf?v=ee9f65a4afb24033813f245a45bc9e83)
### टेस्ट पोस्ट डेटा दर्ज करें
पोस्ट का परीक्षण करने के लिए हमें कुछ सैंपल डेटा की आवश्यकता है। यहाँ एक सुझाव है:
`Post`: "Happy New Year!" दर्ज करें
`Platforms`: एक या अधिक नेटवर्क्स चुनें जिन्हें आपने लिंक किया है। कृपया सुनिश्चित करें कि नाम lowercase में हो।
`Images`: एक [इमेज](https://img.ayrshare.com/012/gb.jpg) या वीडियो अटैच करें।
**आपको Notion में एक इमेज अपलोड करनी होगी।** आप इमेज URL का उपयोग नहीं कर सकते।
`Profile Keys`: यदि आप Business Plan या Launch Plan पर हैं और किसी क्लाइंट की प्रोफ़ाइल पर पोस्ट करना चाहते हैं, तो
उनकी Profile Key दर्ज करें। अन्यथा, खाली छोड़ दें।
`Status`: "pending" दर्ज करें। स्क्रिप्ट केवल उन रिकॉर्ड्स को उठाती है जिनकी स्थिति "pending" पर सेट है। कृपया सुनिश्चित करें
कि "pending" lowercase में हो।
`Schedule Date`: खाली छोड़ दें क्योंकि हम अभी सिर्फ़ तत्काल पोस्टिंग का परीक्षण करेंगे। बाद में आप पोस्ट को शेड्यूल करने के लिए
भविष्य की तारीख चुन सकते हैं।
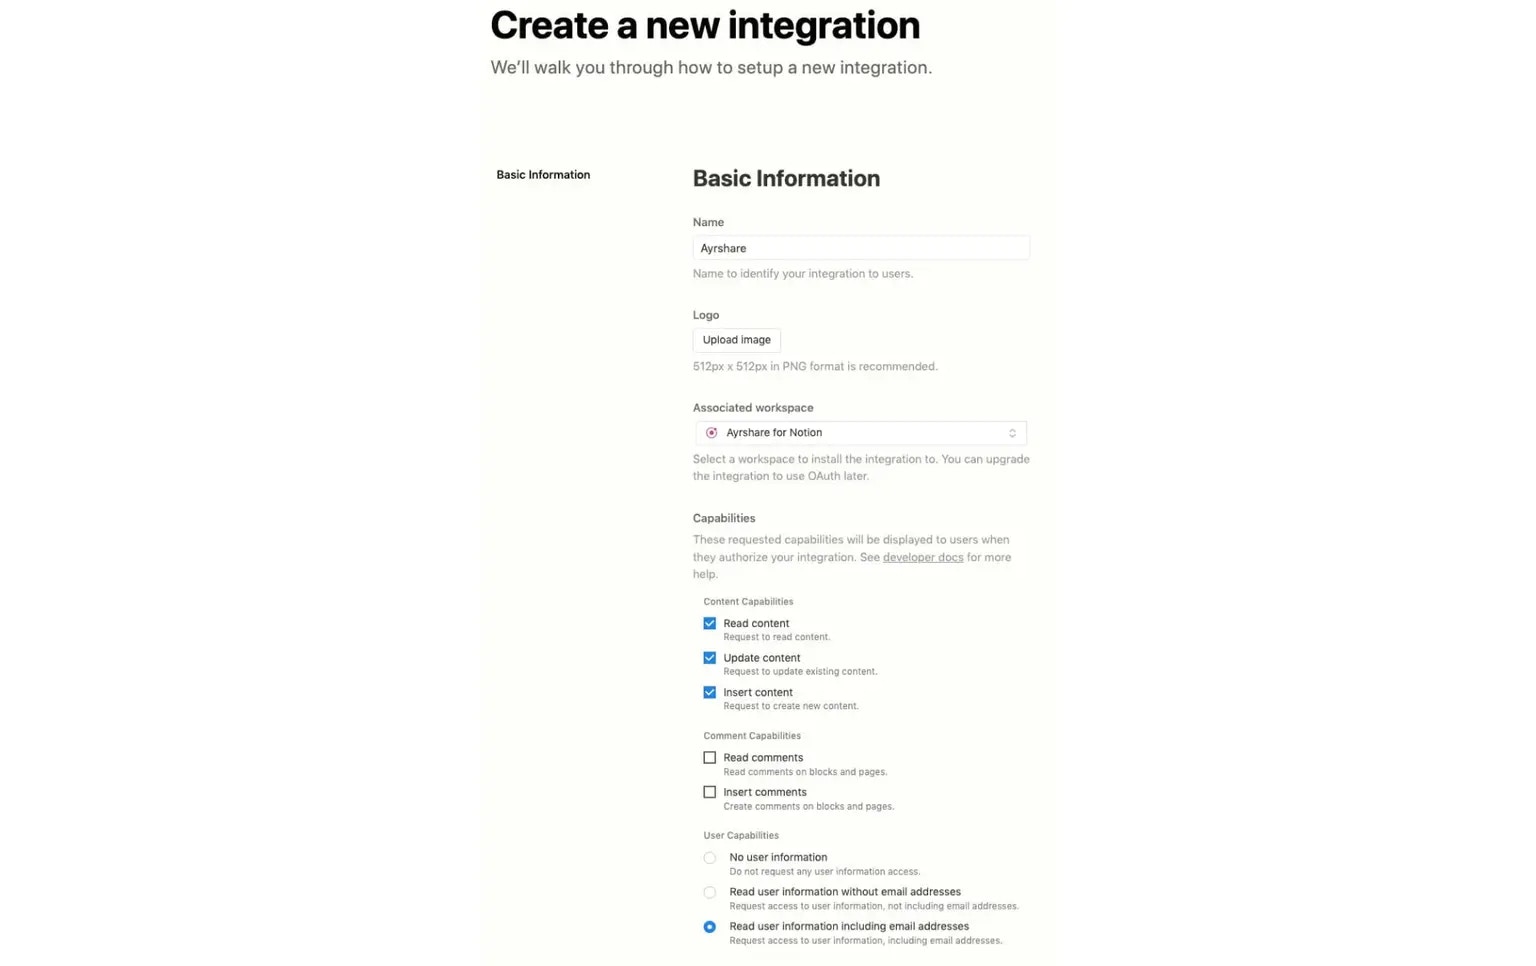
### Notion में आंतरिक एकीकरण बनाएँ
Notion में [My Integrations page](https://www.notion.so/my-integrations) पर जाएँ और New Integration पर क्लिक करें।
[Notion Integrations के बारे में अधिक जानें](https://developers.notion.com/docs/getting-started#utilizing-notions-public-api-for-integrations)।
आप एकीकरण को आसानी से पहचानने के लिए "Ayrshare" नाम दे सकते हैं और उपयुक्त वर्कस्पेस चुन सकते हैं जिसमें पोस्ट डेटा होगा।
अंत में, आपके लिए चयनित डिफ़ॉल्ट क्षमताएँ ठीक रहेंगी। एकीकरण बनाने के लिए सबमिट करें।
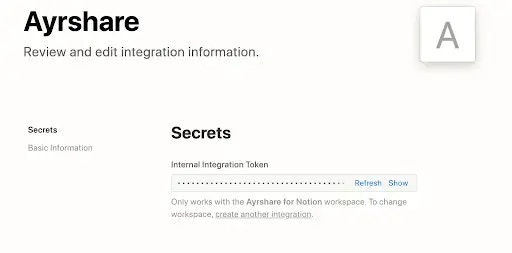
यदि सफल हुआ, तो आपको एक आंतरिक एकीकरण टोकन उपलब्ध होगा। इस पेज में भविष्य के चरणों के लिए इसे नोट करें।
और अपना Notion एकीकरण टोकन इकट्ठा करें।
### Notion डेटाबेस को आंतरिक एकीकरण से कनेक्ट करें
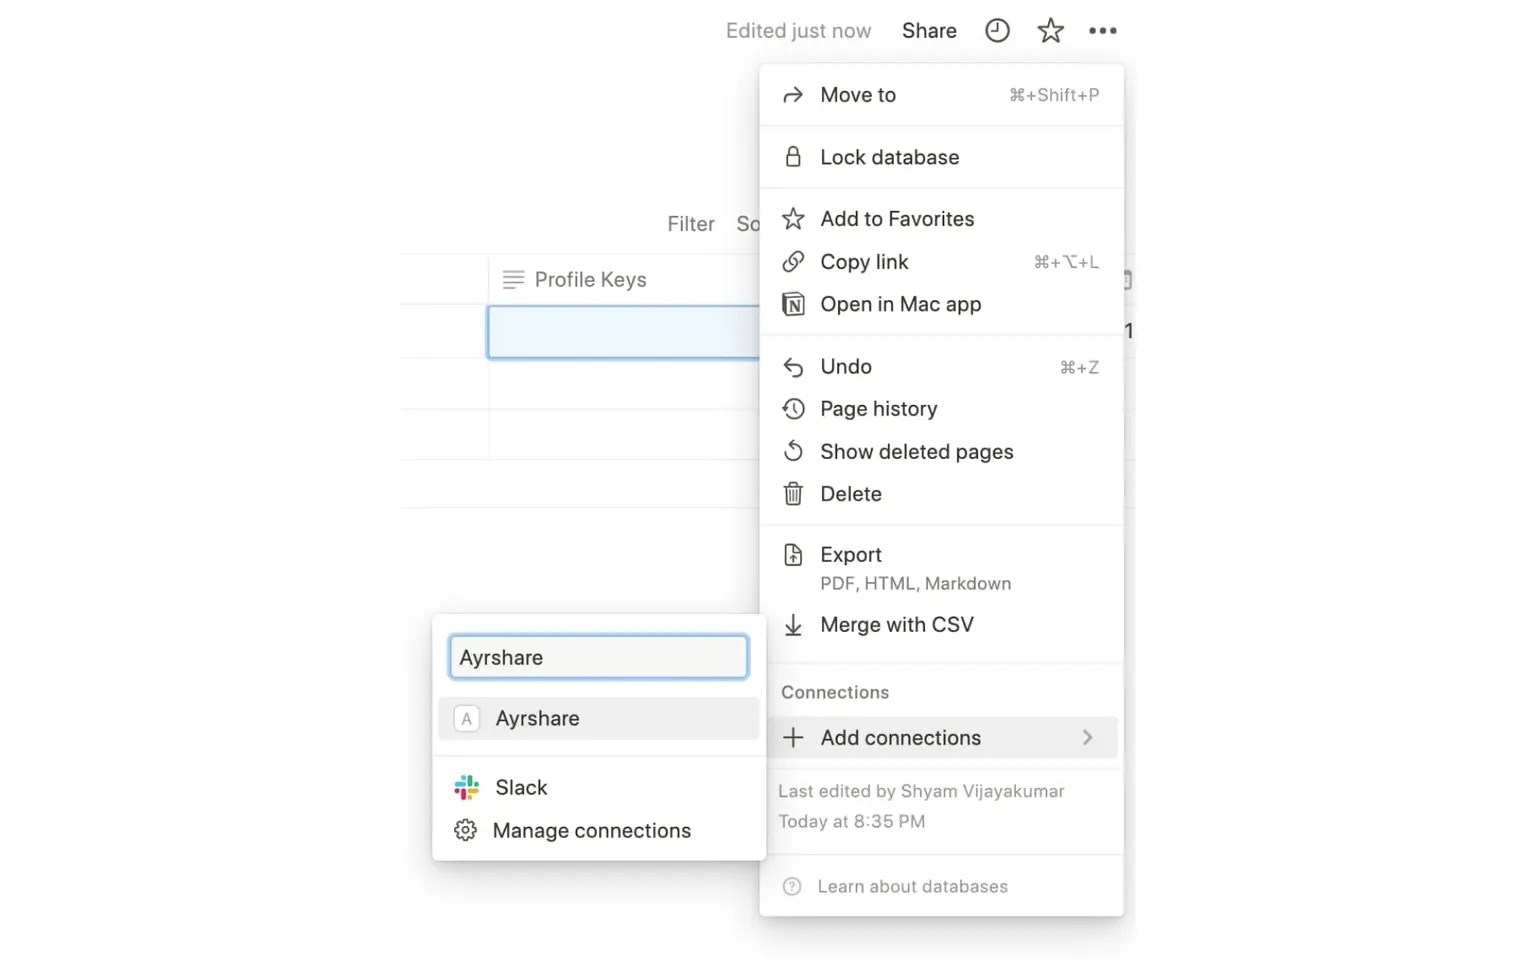
पहले बनाया गया Notion डेटाबेस खोलें। पेज के ऊपरी दाएँ कोने में एलिप्सिस पर क्लिक करें और **Add Connection** पर जाएँ।
यहाँ आप पिछले चरण में बनाए गए आंतरिक एकीकरण को उस नाम से खोज सकते हैं जो आपने उसके लिए चुना था।
एक बार जब आप आंतरिक एकीकरण पर क्लिक करते हैं, तो आपने अब इस Notion डेटाबेस को एकीकरण से कनेक्ट कर लिया है।
### Notion से पोस्ट भेजने के लिए स्क्रिप्ट चलाएँ
अब आप अपने लोकल एनवायरमेंट में एक स्क्रिप्ट चला सकते हैं जो Notion डेटाबेस से डेटा पढ़ेगी और उसमें "pending" स्थिति वाली प्रत्येक पंक्ति के लिए Ayrshare API के माध्यम से एक पोस्ट करेगी।
स्क्रिप्ट में उपयोग किए गए निम्नलिखित एनवायरमेंट वेरिएबल्स को सेट करना सुनिश्चित करें:
`API_KEY`: यह `API Key` है जो आपको Ayrshare से मिलती है। यह आपके Ayrshare प्राथमिक प्रोफ़ाइल की
प्राथमिक API Key है।
`NOTION_DATABASE_ID`: इस पेज पर पहले बनाया गया डेटाबेस खोलें और URL से डेटाबेस ID
प्राप्त करें।
डेटाबेस ID डेटाबेस पेज URL में ?v= से पहले का मान होगा।
```html theme={"system"}
https://www.notion.so/company/?v=aaee9f
```
`NOTION_KEY`: पहले प्राप्त आंतरिक एकीकरण टोकन।
Node.js एनवायरमेंट में निम्नलिखित JavaScript चलाएँ:
**notion** डायरेक्टरी में cd करें और `npm install` चलाएँ।
अपने Ayrshare `API_KEY`, Notion `NOTION_KEY` और
`NOTION_DATABASE_ID` के साथ `.env` फ़ाइल को अपडेट करें।
`node index.js` चलाएँ
आप इसे प्रोडक्शन में [Heroku](https://www.heroku.com/), [Digital Ocean](https://www.digitalocean.com/), या [Vercel](https://vercel.com/) पर चला सकते हैं।
यदि सफल हुआ, तो सभी `pending` स्थिति वाले कॉलम `success` में बदल जाएँगे और पोस्ट्स उपयुक्त सोशल नेटवर्क्स पर की जा चुकी होंगी।
सीधे Notion से अपने सोशल मीडिया नेटवर्क्स पर पोस्ट करें
 इन फ़ील्ड्स का उपयोग इस पेज पर बाद में निर्दिष्ट स्क्रिप्ट में किया जाएगा। कृपया ध्यान दें, कुछ सोशल नेटवर्क "प्लेटफ़ॉर्म्स" के लिए इमेज या वीडियो की आवश्यकता होती है। उदाहरण के लिए, Instagram के लिए एक इमेज या वीडियो और TikTok के लिए एक वीडियो की आवश्यकता होती है। कृपया विभिन्न नेटवर्क्स के लिए [एंडपॉइंट्स](/apis/post/social-networks/facebook) देखें।
[एक लाइव Notion उदाहरण देखें](https://ayrshare-example.notion.site/607c15ce7872456a879adbb0a5f17fdf?v=ee9f65a4afb24033813f245a45bc9e83)
### टेस्ट पोस्ट डेटा दर्ज करें
पोस्ट का परीक्षण करने के लिए हमें कुछ सैंपल डेटा की आवश्यकता है। यहाँ एक सुझाव है:
इन फ़ील्ड्स का उपयोग इस पेज पर बाद में निर्दिष्ट स्क्रिप्ट में किया जाएगा। कृपया ध्यान दें, कुछ सोशल नेटवर्क "प्लेटफ़ॉर्म्स" के लिए इमेज या वीडियो की आवश्यकता होती है। उदाहरण के लिए, Instagram के लिए एक इमेज या वीडियो और TikTok के लिए एक वीडियो की आवश्यकता होती है। कृपया विभिन्न नेटवर्क्स के लिए [एंडपॉइंट्स](/apis/post/social-networks/facebook) देखें।
[एक लाइव Notion उदाहरण देखें](https://ayrshare-example.notion.site/607c15ce7872456a879adbb0a5f17fdf?v=ee9f65a4afb24033813f245a45bc9e83)
### टेस्ट पोस्ट डेटा दर्ज करें
पोस्ट का परीक्षण करने के लिए हमें कुछ सैंपल डेटा की आवश्यकता है। यहाँ एक सुझाव है:
 और अपना Notion एकीकरण टोकन इकट्ठा करें।
 ### Notion डेटाबेस को आंतरिक एकीकरण से कनेक्ट करें
पहले बनाया गया Notion डेटाबेस खोलें। पेज के ऊपरी दाएँ कोने में एलिप्सिस पर क्लिक करें और **Add Connection** पर जाएँ।
यहाँ आप पिछले चरण में बनाए गए आंतरिक एकीकरण को उस नाम से खोज सकते हैं जो आपने उसके लिए चुना था।
एक बार जब आप आंतरिक एकीकरण पर क्लिक करते हैं, तो आपने अब इस Notion डेटाबेस को एकीकरण से कनेक्ट कर लिया है।
### Notion डेटाबेस को आंतरिक एकीकरण से कनेक्ट करें
पहले बनाया गया Notion डेटाबेस खोलें। पेज के ऊपरी दाएँ कोने में एलिप्सिस पर क्लिक करें और **Add Connection** पर जाएँ।
यहाँ आप पिछले चरण में बनाए गए आंतरिक एकीकरण को उस नाम से खोज सकते हैं जो आपने उसके लिए चुना था।
एक बार जब आप आंतरिक एकीकरण पर क्लिक करते हैं, तो आपने अब इस Notion डेटाबेस को एकीकरण से कनेक्ट कर लिया है।
 ### Notion से पोस्ट भेजने के लिए स्क्रिप्ट चलाएँ
अब आप अपने लोकल एनवायरमेंट में एक स्क्रिप्ट चला सकते हैं जो Notion डेटाबेस से डेटा पढ़ेगी और उसमें "pending" स्थिति वाली प्रत्येक पंक्ति के लिए Ayrshare API के माध्यम से एक पोस्ट करेगी।
स्क्रिप्ट में उपयोग किए गए निम्नलिखित एनवायरमेंट वेरिएबल्स को सेट करना सुनिश्चित करें:
### Notion से पोस्ट भेजने के लिए स्क्रिप्ट चलाएँ
अब आप अपने लोकल एनवायरमेंट में एक स्क्रिप्ट चला सकते हैं जो Notion डेटाबेस से डेटा पढ़ेगी और उसमें "pending" स्थिति वाली प्रत्येक पंक्ति के लिए Ayrshare API के माध्यम से एक पोस्ट करेगी।
स्क्रिप्ट में उपयोग किए गए निम्नलिखित एनवायरमेंट वेरिएबल्स को सेट करना सुनिश्चित करें: