> ## Documentation Index
> Fetch the complete documentation index at: https://ayrshare.mintlify.site/llms.txt
> Use this file to discover all available pages before exploring further.
# Bubble.io
> Bubble Ayrshare プラグインまたは API Connector を使用して、ユーザーのソーシャルメディアアカウントを管理します
## 概要
[Bubble.io](https://www.bubble.io) は人気のノーコードプラットフォームで、コードを一切書かずに Web およびモバイルアプリを構築できます。
Ayrshare のソーシャルメディア API を統合することで、Bubble アプリ内から直接ユーザーのソーシャルメディアアカウントを管理できます。
これを実現する方法は 2 つあります:
**Bubble Ayrshare プラグイン**: ユーザーフレンドリーな選択肢で、最小限のセットアップで利用できます。ただし、Bubble API Connector と比較すると
機能は限られています。
**Bubble API Connector**: より高い柔軟性と制御を求める場合には、Bubble API Connector を利用します。
このアプローチにより、Ayrshare の API を直接操作でき、Bubble.io アプリ内でより幅広い機能を実現できます。
このガイドでは両方の統合オプションについて説明します。
## クイックスタート: Bubble.io Ayrshare プラグイン
[Bubble は最も強力なノーコードソフトウェア開発プラットフォームの 1 つです](https://www.ayrshare.com/blog/the-definitive-bubble-review-a-flexible-no-code-app-builder-growing-over-50/)。最も簡単に始められるのは、Ayrshare の [Bubble.io プラグイン](https://bubble.io/plugin/ayrshare-social-media-api-1607956467620x490188301088063500)です。より[高度な Bubble 統合](/packages-guides/bubble#the-bubble-api-connector-plugin)については以下を参照してください。
VIDEO
まず [ayrshare.com](https://www.ayrshare.com) でアカウントを作成します。次にソーシャルメディアアカウントを接続します。
Bubble アプリに API Key を貼り付ける際は、API Key の前に「Bearer」という単語を含めることを忘れないでください。
例:
`Bearer bf55cc6f-76ac-46ce-b497-439d766f6c12`
Bubble プラグインマーケットプレイスから Ayrshare プラグインを Bubble アプリに追加します。プラグインのフィールド「API Key」に API Key を入力します。
これで、Bubble アプリからソーシャルメディアアカウントに投稿を送信できるようになります。
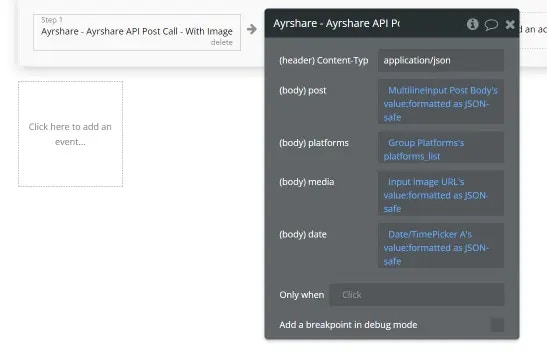
以下の画像は、画像付きの投稿のためにプラグインを呼び出す Bubble のワークフロー呼び出しの例です。
上記の動画で詳しく説明しています。以下のパラメータタイプを使用していることを確認してください:
post: JSON セーフとして書式設定されたテキスト
platforms: 各テキストが `"facebook","instagram"` のように括弧で囲まれたテキストのリスト
media: JSON セーフとして書式設定されたテキスト URL
date: JSON セーフとして書式設定された日付/時刻
Bubble の API Connector は、閉じ引用符やスペースを 1 つでも欠くと接続が失敗するなど、扱いに注意が必要な場合があります。
以下の動画を注意深く見て、うまく動作しない場合は再確認することをお勧めします。
VIDEO
以下は、Bubble でソーシャルプロファイル分析を取得する方法を示す別のチュートリアル動画です。
VIDEO
## 複数のソーシャルメディアアカウントに投稿する
概要を示す記事は以下のとおりです:
VIDEO
## Bubble で AI を使ってテキストを書き直しソーシャルに投稿する
Ayrshare と Bubble.io を使用して、書き直しとソーシャル投稿アプリを構築する方法。このアプリはテキストを受け取り、5 通りに書き直し、ソーシャルアカウントに投稿します。
VIDEO
## Bubble API Connector
Ayrshare API 呼び出しを行うには、[Bubble API Connector](https://manual.bubble.io/account-and-marketplace/building-plugins/adding-api-connections) の使用をお勧めします。
Bubble はすべての API 呼び出しを 150 秒後にタイムアウトさせ、その後もう一度だけ再試行することにご注意ください。大きな動画は 150 秒以上かかる場合があり、これにより Bubble が自動的にもう一度投稿を試行し、重複投稿エラーの原因となります。大きな動画には[スケジュール投稿](/help-center/technical-support/response_bad_gateway_502_or_504_error)の使用をお勧めします。
## 参考になる Bubble ブログ記事
* [ノーコードでソーシャルメディア投稿モバイルアプリを構築する](https://www.ayrshare.com/blog/build-a-social-media-posting-mobile-app-with-no-code/)。
* [ノーコードでソーシャルメディアスケジューリングアプリを作成する方法。](https://www.ayrshare.com/blog/how-to-create-a-social-media-scheduling-app-with-no-code/)
 Ayrshare プラグインでは投稿と投稿の削除を行えます。Ayrshare の全機能を活用するには、Bubble API Connector プラグインを使用し、アプリに必要なエンドポイントで設定することをお勧めします。
## Bubble API Connector プラグイン
代わりに、Bubble API Connector プラグインを使用して Ayrshare API の全機能にアクセスすることもできます。以下は、Ayrshare で Bubble API Connector を使い始めるための動画で、1 件の投稿に複数の画像を投稿する方法を説明しています。
Ayrshare プラグインでは投稿と投稿の削除を行えます。Ayrshare の全機能を活用するには、Bubble API Connector プラグインを使用し、アプリに必要なエンドポイントで設定することをお勧めします。
## Bubble API Connector プラグイン
代わりに、Bubble API Connector プラグインを使用して Ayrshare API の全機能にアクセスすることもできます。以下は、Ayrshare で Bubble API Connector を使い始めるための動画で、1 件の投稿に複数の画像を投稿する方法を説明しています。
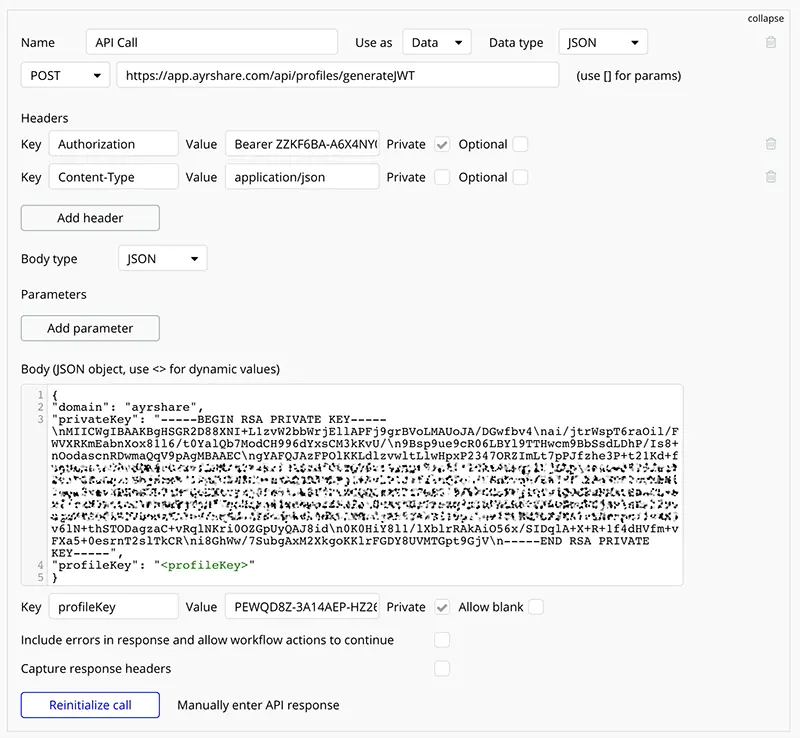
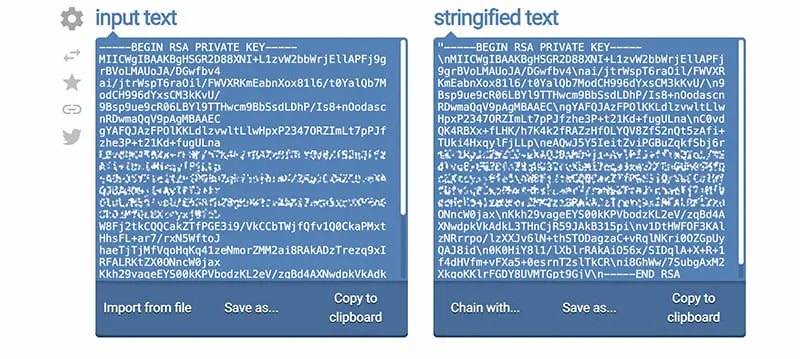 **ステップ 2:** Bubble アプリ内で、以下のように API Connector で新しい呼び出しを作成します。Body 領域の `privateKey` フィールドのテキストは、上記のステップ 1 で作成した文字列化されたテキストです。
以下のように、提供された `domain` と `profileKey` も含めます。
**ステップ 2:** Bubble アプリ内で、以下のように API Connector で新しい呼び出しを作成します。Body 領域の `privateKey` フィールドのテキストは、上記のステップ 1 で作成した文字列化されたテキストです。
以下のように、提供された `domain` と `profileKey` も含めます。
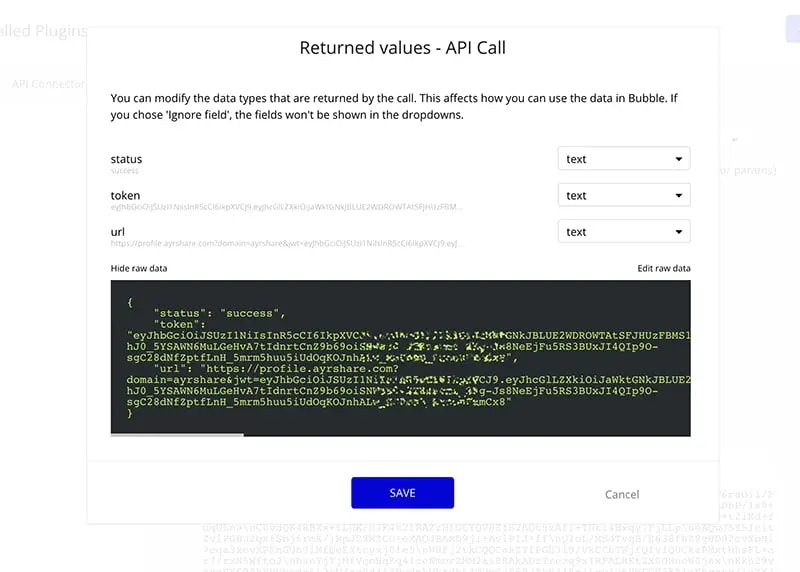
 **ステップ 3:** **Initialize call** ボタンをクリックしてレスポンスを保存します。レスポンス内の `url` フィールドが、ユーザーがソーシャルメディアアカウントのリンクページにアクセスするためにクリックする URL です。
 ## ユーザーが自分のソーシャルアカウントをリンクできるようにする
Launch Plan、Business Plan、または Enterprise Plan を利用している場合、この動画では、すべてのユーザーが自分のソーシャルアカウントをリンクできるように Bubble をセットアップする方法を説明しています。
## ユーザーが自分のソーシャルアカウントをリンクできるようにする
Launch Plan、Business Plan、または Enterprise Plan を利用している場合、この動画では、すべてのユーザーが自分のソーシャルアカウントをリンクできるように Bubble をセットアップする方法を説明しています。